How to Use the Grid
Although it may seem obvious how to use the grid, it is actually generated in a very precise way. Feel free to simply drag windows to more or less contact the grid lines, and you get a pretty good idea of how big your windows are. For most design cases, this is fine. If, however, you want to be able to precisely size a window repeatedly for taking screen shots, read on for the next level of detail.
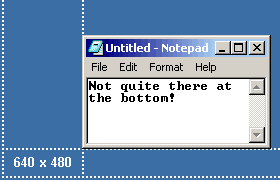
 The grid lines are drawn
where the outside edges of them define the dimension, no matter how thick you
make them. The idea is to bring the window's edges to just cover the grid lines.
The grid lines are dotted by default to make it very easy to see when they are
covered. Take a look at the example on the right. The left side of the window
has covered the vertical grid line, but the bottom is just short.
As a user tip, here's a little-known trick that works in all versions of Microsoft Windows. If you click and hold on an edge or corner of a window, you can use the arrow keys to move that side in steps. Using the Ctrl key with the arrow key moves the side in one-pixel steps. In a similar way, you can move the window around by clicking and holding the title bar (you may have to "nudge" the window with the mouse to get it going first).
Although the default screen sizes for the grid represent typical full-screen sizes, there's nothing stopping you from defining a screen size for taking repeated screen shots of a window. For example, if your documentation requires several shots of different text in Notepad over time, you can define a custom screen size to use to size Notepad each time. This way, each shot is exactly the same size.